Friday, July 22, 2011

Cupcakes and Waffle Cookies


Hello! Here I am again, with some tasty treats.
To begin: On July 19th, 1974, in the great state of Colorado, was born my sister, Tina! Yay!

To celebrate Tina's birthday, we decided to have some foods and do a little shopping and eat cupcakes! This was on Sunday the 17th. It was sooooooo hot that day. Here in Northwest Wisconsin, we're just coming off a heat wave. It was hot, y'all. I am a delicate flower, so I do not do well in the heat. We have air conditioning, but we also live on the third floor, so our little window unit has a hard time keeping up with all of the heat from outside and the two floors below us.

So, what do do when it's really hot outside
and the air is having trouble keeping up?
Why, bake of course! (Yeah, I know. I'm a moron.)


I got this recipe from a website that called these beauties "White Velvet" cupcakes. In the description of the recipe, this person said that this was a cupcake that was just like a red-velvet cupcake, just without the red food coloring. Weeeeeeeeeellll, I don't necessarily agree with that. Whenever I've made red velvet cake, cupcakes or cookies, I have always included cocoa powder in the batter. Red Velvet cake is a lightly chocolate cake that is colored red. I have seen different recipes for Red Velvet that don't include chocolate, but I consider that to be sacrilege. I digress. The point is, I have decided to call these Vanilla Cupcakes. I know, not really very original, but it's what they are, folks.
My sister, Amanda, said that these cupcakes were like a sugar cookie in cupcake form. Deeeeeeelish.


I think that the part about using the kitchen scale to portion out equal amounts of batter is a great idea. I used 1.7 oz per cupcake and they all turned out the same size! Brilliant!
I didn't use the buttercream recipe on the page with the cupcakes, because I wasn't quite ready for the egg-yolk buttercream. I'll work up the courage eventually, but not now. Instead I used this recipe:

Vanilla Buttercream Frosting

1 cup (2 sticks) unsalted butter, at room temperature
3-4 cups powdered sugar, SIFTED
1/4 tsp salt
1 Tbsp vanilla extract
up to 4 Tbsp milk or heavy cream

Beat the butter on medium speed of your mixer until light and fluffy. Add 3 cups powdered sugar and mix on low speed until incorporated. Increase speed to medium and add vanilla, salt and 2 Tbsp. milk and beat for 3 minutes. Add more sugar or milk as needed to achieve desired consistency.

Seriously, this frosting is AMAZING. I finally had to put dish soap in the bowl to keep myself from just wearing it on my head like a helmet and licking it clean. This made quite a lot of frosting, I had A LOT leftover, so you can either halve the recipe or store it in the freezer for the next time you make cupcakes or cookies or what have you.

Moving on, with it being so very, very hot, I decided last night to make cookies on my waffle iron. There is a story here, as well. When I was in junior high/high school, I had a friend named Lisa. Lisa Berg. I ate at her house a lot, and vice versa. Lisa's mom, Dot, used to make these chocolate waffle-iron cookies that were awesome! A little over a year ago, Lisa's family had a big Fourth of July party and I requested the waffle iron cookies! Saint Dot graciously consented to make them and they were just as awesome as I remember.
So, I decided to try some different kinds of waffle cookies. I found this recipe for Gualletes. They are French and oh so good. The recipe in the link is huge, so I decided to quarter it. I used: 1 stick of butter
3/4 cup of dark brown sugar (I use dark brown sugar almost exclusively, because it is tasty)
2 eggs
1 Tbsp vanilla extract (yeah, I didn't quarter this part. I loves me some vanilla.)
1 3/4 cups A.P. flour
1/4 tsp baking soda (no quartering here either. It's just silly when there is so little in it to begin with)
and 1/8 tsp salt.
I have a crappy $10 Wal-Mart waffle iron, and these cookies came out great. They were really good right off the waffle iron and even better the next day. They get way chewier and the vanilla and brown sugar combination is very good. I might make the whole recipe for Christmas cookies this year (after I've upgraded my waffle iron.) Here is a picture:

Sooooooo delicious. This is a good recipe for hot days when you don't want to turn the oven on. They're also nice because they bake in about 2 minutes. You have to stand over the waffle maker to switch them out, but I still think it's better than heating up the house.

Enjoy!

Wednesday, June 29, 2011

Rhubarb, strawberries and Father's day. Oh, also new blog title!


Well hello! I have changed the look and title of the blog! You are now reading "Evil Sarah Bakes"! If you followed The Bakeress, you'll have to "re-follow" Evil Sarah.
"Why Evil Sarah?" you ask, confusion writ large on your precious face. Well, when I was a gainfully employed, productive member of society, I used to work at a local business as a wage-slave manufacturing printed circuit boards. (I know, how did I ever leave the glamour and sexiness of that lifestyle?) Anyway, there came a time when there was another Sarah who came to work with us. She was very young and pretty and sweet, while I was old(er), more *ahem* "mature-looking" and (let's face it) bitchier. So, she became known as "Good Sarah" and I was "Evil Sarah" in order to differentiate references to the two of us. I wholeheartedly approved of this system. (I'm not sure how Good Sarah felt about it, but she didn't protest, so I'm sure she was OK with it.) Soon, my moniker was shortened to just "Evil". It really saved time establishing that I wasn't going to take any crap from new people and it was funny. Once, my supervisor was looking for me and she poked her head into a room and asked "Is Evil in here?" Someone answered "No, she's in the other room." in a very matter-of-fact tone, totally confusing and probably scaring the trainee that was sitting next to him. Ha! In fact, a lot of the people there still refer to me as Evil Sarah and when I call my husband at work, I always tell whoever answers the phone that "This is Evil Sarah, is Jonathan there?"

Ok! Enough about hilarious nicknames! Let's bake!

So, when was Father's day? Like a hundred years ago? Oh! It was like 2 weeks ago. Great! I'm not as behind the times as I thought I was! Yay!
As I mentioned above, with school out for summer, I am really just a bum until the fall. This causes the household budget to be pretty tight during the summer months, so I decided to bake for my dad for Father's day. I think he was pretty happy about it:
There's m'dad! Ken Schaefer, the best dad in the world, posing with the rhubarb crisp bars I made! Since the bars are in the picture, we'll start with these!
It's farmer's market season here in northwest Wisconsin, so there was lots and lots of rhubarb right away and I snapped up as much as I could. There are many 1-cup portion bags of it in my freezer. My dad loves rhubarb (as do I). I got the recipe for these beauties here, at Tasty Kitchen. Mmm mmm mmm mmm mmmmm, Tassssssssssssssty Kitchen indeed. As a matter of fact, "Tasty Kitchen" was my nickname in high school. They are kind of like if a pie and a crisp had a baby, somewhere in a lab. A piesp. Or crie. I like piesp better.
I substituted whole wheat pastry flour instead of all purpose flour. This was just an experiment to add texture and to see if it would make a structural difference. There is nothing you can do to make these "healthy". Sure, the whole wheat makes it just a tad healthier, but there is enough butter in this recipe to choke a horse (which is as it should be and just the way I like it.) There's also a lot of brown sugar. Brown sugar and butter. Mmmmmmmmmmmm. Huh? Wait....what? What was I saying? Oh! Piesp! The whole wheat pastry flour (which is also called graham flour, a little fun fact (an ff) for you there) worked very nicely. I had made these for a potluck for the old man (my husband) for work and I used A.P. flour. I thought that the w.w. pastry flour gave it more texture and body than the A.P. Anyway, these bars have a bottom crust (like a pie) with a wonderful crumbly topping (like a crisp). I like a crisp with a bottom crust. I don't know why, but when there's just crumbly topping over fruit, it just seems like there isn't enough "crisp". I always put a bottom crust on my apple crisp and I would never make it another way. You could use this recipe for apple crisp, but I would maybe add some cinnamon and nutmeg to both the topping and the apples.
Anyway, dad and I ate this bitch up, yo. It was soooo good. The rhubarb is tart and the crust is warm and sweet. Some people don't like the tartness (or celery-like texture) of rhubarb by itself. That's why you see a lot of strawberry-rhubarb stuff out there. Strawberry rhubarb stuff is good, don't get me wrong, but sometimes you just need the contrast of the tart with the sweet.
Next up! Rhubarb cookies!
I got the recipe for these on allrecipes.com. They tasted really good, but they were a little structurally unsound. I'm not sure why, but they really didn't hold together very well. I decided to bag the cookies, sans frosting, and frost them at my parents' house. While they were in the bag, they kind of turned into a kind of cookie-mass. That might have been because they should have been in a hard-sided container or I should have let them cool more before bagging them. I've had problems with softer cookies in plastic bags before, so maybe I should just stop doing that. BUT THEY'RE SO HANDY!
Anyway, these cookies are topped with a wonderful, tasty cream cheese frosting. Seriously, I will eat anything if there is cream cheese frosting on it. Broccoli, toast, mashed potatoes, my shoe. Anything.
The cookies had a good flavor, if not the best texture. The rhubarb is just mixed in with the dough, so the tartness isn't as strong as it is in other applications, like pie or crisp. The frosting and the coconut do give the cookies a nice sweetness for people who don't like the tartness of rhubarb in pie or crisp. I probably wont' make these cookies again, since they didn't send me over the moon and there are many more rhubarb recipes to try.

Alright. Since my mom and sister aren't all that crazy about rhubarb, I made a little something for them as well. Strawberries just made their appearance recently *cue "Hallelujah Chorus" here*. The availability of local strawberries is an occurrence to which I look forward almost as much as the local peaches become available in August. So yummy! I wanted something easy and easily thrown together since I was flagging fast with the rhubarb-a-palooza above. So, I got this Strawberry Summer Cake recipe at Smitten Kitchen ( lovely blog). The picture on the SK site looks different than mine (and I'll try to explain that here in a minute):

Notice how the strawberries have all hidden in my cake, while they are all visible and beautiful in the SK picture. The only reason for this that I can think of is that I used a 9 inch pie pan. The SK says that, if you use a 9 inch pie pan, it will overflow. Mine did not overflow (thank God.) However, it did make the cake part thicker, so the strawberries were enveloped. The larger pie plate will spread the batter out more and the strawberries will be easier to see. It might not have been as pretty as the SK cake, but it was REAAAAAALLLLLYYYYYYYYYYYYY good. I mean really really really good. There is no frosting or glaze on this cake and it really doesn't need one. The cake is moist and the strawberries stayed very sweet and tender. My sister, Amanda liked it so much, she asked for it to be her birthday cake in August. This makes me happy, since it's a really easy cake to make. Here is a picture of Amanda's piece covered in whipped cream (which I personally think is gross, but lots of people like whipped cream, and I understand it was good on this cake):
Amanda is helpfully pointing to the cake with her fork.

Well, there you have it! Three fun summer dessert recipes to try with seasonal local fruit!

Questions? Comments? Please leave them below and I'll get right back to you!

Sunday, June 12, 2011

Granola!


Hello everyone! I am so sorry it's been a million years since I last graced you with some tasty musings. First, it was end of the semester and I was running around trying to get everything read and written and suchlike. Then Jonathan and I suffered the loss of our 15 year-old cat, Claude. Here he is, nonchalantly lounging on the counter (where he is NOT supposed to be). It was just so funny, I had to take a picture before I shooed him off. Silly boy. We will miss him a lot.


Now for some food!
I have lots and lots of stuff to tell you about, but I'll start out with some GRAAAAAAAANOLAAAAAA!(imagine me shouting this a lot like the guy in the Ricola commercials).

I like to eat granola in the morning with yogurt. Yum yummy. However, buying granola at the store is either a)expensive, b) full of ingredients that I cannot pronounce or c) both. Making your own granola is delicious and easier than falling in love.

An extreme close-up of the crunchy goodness.

This is a fun recipe and you can really tailor it to your own tastes and preferences. You need to get the liquid proportions and sweetener proportions pretty close, but other than that, go nuts.

I like to use rolled oats and quinoa (uncooked) for the base and brown sugar and real maple syrup for the
sweeteners.

You want a relatively low oven temperature for this, so the brown sugar gets a chance to caramelize and make the granola nice and chewy as well as crispy.
I use canola oil in my granola, but you can use any light oil you wish. A light olive oil might be nice as well. (The "canola/granola" rhyme above is not lost on me. It was accidental and therefore more awesome.)
The recipe below is roughly what I use when I make granola. It varies from time to time depending on my mood and what I have on hand. I will put the more open-ended, general amounts in italics.

Granola!
2 cups quick-cooking rolled oats (this is kind of a must. It's a good
base and makes up the "chewiness" of the granola. You can use
3 cups of oats if you don't want to use any quinoa.)
1/2 cup white quinoa, uncooked (if you buy your quinoa at the grocery store, sometimes
it's pre-rinsed. The stuff I buy at Target is pre-rinsed. If you buy your
quinoa in bulk, you'll have to rinse it and spread it out to dry
before adding it. When I buy quinoa at Weavers in bulk, I rinse it
myself. If you don't, it'll taste bitter.)
1 to 1 and 1/2 cups of nuts, seeds, fruit and other sundry items ( the last time
I made this, I used 1/4 cup roasted sunflower seeds {divested of their shells}, 1/4 cup
pepitas {which are shelled pumpkin seeds}, 1/4 cup flax seeds,
1/4 cup unsweetened coconut and 1/4 cup chopped pecans. You can
add raisins, dried cranberries, really any dried fruit you like. You
can also add different kinds of nuts and seeds. Sesame seeds
are tasty, I hear, and cashews are AWESOME. You can really
just use your own preferences here as to amounts. If you add more than
about a cup and a half, you might want to add a little more oil or liquid sweetener.)
2 Tablespoons wheat germ (obviously, if you can't have wheat, skip this.
It does add a nice toasty flavor and crunch to the granola, though. Also, more
fiber! Nothing like a shotgun blast of fiber to put a spring in your
step and a song in your heart.)
3 Tablespoons dark brown sugar (I will never make granola without
brown sugar again. It really adds a nice depth to the flavor.)
1/4 -1/3 cup real maple syrup (I only use a quarter cup. If you
want your granola sweeter, then add more. I like to use real maple
syrup since it doesn't scream "MAPLE!!!!" it just give it a nice sweetness.
You can also use honey, or both. If you're using only honey, make sure
to keep an eye on the granola in the oven, since honey browns faster than
the maple syrup. Honey is just a little too sweet for me. )
3 Tablespoons Canola oil (or some other sort of oil. This will help the
granola clump a little bit and make it a little chewy.)
A dash of cinnamon (completely optional)
1 teaspoon vanilla (or other liquid flavoring. Almond extract, or coconut
extract or whatever strikes your fancy. This, too is optional.)

Mix everything together in a bowl, except the maple syrup/honey, oil, and liquid flavoring. Be sure to add the brown sugar at this point, so it has a chance to get all mixed up with the dry ingredients. If you wait and add it with the syrup and oil, the brown sugar will get all clumpy. After everything is nicely mixed, add a little salt, if you want and then add the oil, syrup and or honey, and vanilla (or other liquid flavor). Mix it all together and spread it out on a parchment-lined, rimmed cookie sheet.
I took this picture when I was using the foil and not parchment.
Let's pause a minute and talk about the preparation of the cookie sheet. When I was working out this method, I at first used that non-stick foil on the cookie sheet and then sprayed it with cooking spray. Now, don't get me wrong, I love the non-stick foil. I use it whenever I bake or roast something in the oven, from tater tots to asparagus. It saves a lot of clean-up. However, the foil does not work well for granola. Even when sprayed with cooking spray, the granola (particularly the quinoa) sticks to it. I don't know why, I'm not a physicist. So! Use parchment paper, and no sticking. Just for good measure and to make stirring easier, I add cooking spray to the parchment paper as well.

Once you have everything on the lined cookie sheet (and it has to be a rimmed cookie sheet, or all of your granola will fall off in the oven, and it'll be just an appalling mess.) Put it in a preheated 250-300F degree oven. The low temperature bakes it slowly and helps the flavors meld. I set my timer for 10 minutes, then I stir the granola, set the timer for another 10 minutes, and stir and so on. You might want to set your timer for 5 minutes at first, until you know how your oven will work with this recipe. It usually takes 30 minutes total when I make it in my oven, with 2 stirrings. If you don't stir the granola, the edges will get really done and the middle will remain raw. If you don't keep an eye on it, it will burn and that's no fun for anybody.
Once the granola is browned to your satisfaction, take it out of the oven and let it cool on the pan on a cooling rack. When it's cool, I put mine in a gallon size zip-top bag and store it in the pantry. When I'm making granola for others, I divide it up into two smaller zip-top bags.
If you have any questions/comments, please let me know! I promise it won't be so long until I write again!


Saturday, April 9, 2011

Cookies with Exotic Spices!


Hello, my friends! There is so much to blog about! I will sprinkle all of my latest baking exploits throughout the next few days/weeks.

Today: Gingersnaps and Cardamom Cookies

O.K. you guys. I have a confession to make. I love cookies. There! I said it! Don't judge me! Cookies are awesome. There is no problem, physical, emotional, or spiritual, that cannot be made better by a delicious and well-crafted cookie.

My mother makes the best chocolate chip cookies in the entire world. No joke. There are people all over the country who would agree with this. They are called "Aunt Sharon's Chockie Bickies" which is a reference to a delightful cartoon from years ago called "Count Duckula" which is about a vampire duck that only sucks the "blood" of vegetables. (Trust me, it's hilarious). Anyway, Duckula still has a nanny that lives with him. Her name is "Nanny". She has a perpetually broken wing and calls Count Duckula "Ducky-boos". She calls her tea-time treats "Chockie Bickies". There's a little Schaefer family anecdote for you to tell at parties and various other social gatherings.

I did not make chocolate chip cookies (though I did inherit the skill from my Mama). Instead, I decided to try two cookies I haven't tried making before.

Gingersnaps. When I was a little girl, my dad's parents, Gramma and Grampa Schaefer were visiting (I think we were living in North Dakota at the time). Grampa had gotten a huge box of gingersnaps and he and I were eating them on the couch watching baseball or Richard Simmons or something. My mom was running out on some errand or something and she asked my Grampa to not let me eat too many gingersnaps, because they would make me sick and ruin my supper. During the time she was gone, Grampa and I just kept dipping our hands into the box of cookies. Not speaking, not looking at each other. Just comfortable in our mutual love of far too many gingersnaps. My mother was proven right (as she always is) and I had a heck of a stomach ache when she got home. She was all "Bill, did you let her eat all those gingersnaps?" I don't really remember Grampa's response but it was probably a shrug for her and a wink for me. Even though my tummy hurt, it was still 100% awesome. To this day, I do not regret eating those gingersnaps.

So! Here are the gingersnaps I made!
It's more of a close-up of their adorable, golden-brown bottoms, but you get the picture. I took the recipe from Coconut & Lime. I liked this recipe because it didn't require me to roll out and cut any dough. They were drop cookies! Yay! The recipe called for Demerara sugar, but I didn't have any on hand, so I used Turbinado sugar instead.
This is turbinado, or "raw" sugar. The differences between this and other sugars is something about molasses or what not. If you want to know exactly, go here.
The raw sugar is used to roll the dough in before they are baked.

Deeeeeeelicious. The flavor of these cookies was very good, but they weren't very crispy. There wasn't much "snap" in the gingersnap. It looks like I might not have flattened them enough before baking. Perhaps I will flatten them more next time.

Moving on! Cardamom cookies.

I have another confession. I don't like Indian food. My God, I've tried. I've tried so hard to like it. The spices are weird and unsettling. This is distressing to my husband and my youngest sister, both of whom looooooooove Indian food. We go to the Twin Cities sometimes to have Indian food for Jonathan's birthday. I always bring Amanda (my sister) with us, since I figure Jonathan would enjoy it more with someone who is enjoying the food as well. I usually just load up on naan and stop on the way home for a Blizzard. So, when I saw this recipe, I was a little wary. I don't like cardamom in savory dishes.

(Nor do I like cinnamon in savory dishes. That's why I call Indian food "Cinnamon Beef" which, now that I look at it, could be very offensive to some people. My apologies. It's really in reference to having corned beef and cabbage one St. Patrick's Day at Jonathan's best friend Rick's and his lady, Susan's house. Susan and I were not that enthusiastic about the beef. We called it cinnamon beef. Anyway, I digress.)

So! I thought I might like cardamom in a sweet dish. This, sadly, was not to be. I did not like them. Not surprisingly, Jonathan, Amanda and someone in Jonathan's D&D group (nerd alert!) all liked them. So, who knows? Maybe you'll like them.

Cardamom Cookies

2 1/4 cups all-purpose flour
1 tsp cream of tartar
1/2 cup butter, softened
3/4 tsp ground cardamom
1 tsp baking soda
1/4 tsp salt
1 cup light brown sugar
1 egg
1 tsp vanilla (optional)

Preheat oven to 350 degrees F. Sift together flour and cream of tartar into a medium bowl. In a large bowl, cream butter, cardamom, baking soda and salt. Add sugar and beat until well combined. Beat in egg and vanilla. Gradually stir in flour mixture. Shape dough into 1-inch balls and flatten them slightly with the palm of your hand onto a parchment-lined baking sheet. Bake for 10 minutes, until cookies are a light golden brown. Let them rest on a baking sheet for several minutes before removing to a wire rack to cool completely.

While we're on the subject of cookies, let me introduce you to the cookie-baker's best friend: the disher. "What is a disher?" you ask, one eyebrow rising in inquiry, your eyes filled with confusion and a little rage. This, my friends, is a disher:
"Oh! A lunch lady scoop!" you exclaim. I close my eyes and slowly shake my head. "Yes. A lunch lady scoop. This is its technical name,"I say.
Anyway, this tool is really awesome for making uniformly-sized cookies. I have three different sizes of them!

See? I usually use the smallest one for cookies. Unless I want to make really big cookies. They are super handy! There is a little sweepy-arm that scrapes the inside of the scoop when you squeeze the handle! What mad genius thought of this?! Anyway, I got these at the kitchen store at the mall in Eau Claire, but you might be able to get them at a Target or a Walmart- type store.


Well, there you have it. Cookies.

Cookies make everything better.

Saturday, April 2, 2011

The Quest for Wheat Bread: The Good, The Horrible and the Meh.

Hello! Wow, it's been two weeks since I wrote! I am sorry! The reason I haven't written in all of that time is because I was having problems getting some whole wheat bread made. There were some..... interesting results. I will show them all to you.
Ok, now, look at me. Look into my eyes. Look at me! Ok. This is going to get ugly. It's going to get real ugly, but you need to stay with me! Don't you go anywhere! I promise I won't leave you!

Alright. Failed bread attempt #1.

I got this recipe from http://www.best-bread-recipes.com/golden-grain-bread.html. It seems pretty cool, and the finished product tasted O.K. but I was not happy with the shape of the loaves. This is my fault, since I tried to do a free-form loaf without any free-form-loaf making experience or training. I know just enough about free-form loaves to be dangerous.

Here is what they looked like just out of the oven:

Not too bad, I will admit. Since this recipe makes FOUR loaves of bread, I had to try free-form since I don't have 4 loaf pans. I realized later that I could have make 2 or 3 loaves, and either used the rest to make dinner rolls or freeze the dough and thaw it out to rise later. Perhaps I will give this one the old college try again sometime and halve the recipe. I was making wheat bread because I like to have it for toast in the morning and I was buying it from a local bakery for a ridiculous price. So, I decided to try making it myself.
This particular recipe had lots of grain-y goodness in it that appealed to me: cracked wheat, sunflower seeds, cornmeal, rolled oats and wheat bran. I added flax seeds as well. I bought all of these grains in bulk at Festival Foods in Eau Claire, but most grocery stores have a bulk/health food section these days and you can find them there. What you probably won't find, unless you live in a big city, is cracked wheat. This is basically a wheat grain that has been cracked (so it's not just a clever name.) It's used a lot in Indian and other eastern cooking. I couldn't find it, so I just bought regular wheat berries and decided to crack them myself. (Not as easy as it sounds.) I tried cracking them in my food processor, that didn't work. So I gave up and just put them whole in the bread. This worked fine, since the rising and baking process softened them up.
As I said, this bread tasted fine, but it was not very easily toasted. So, I would suggest, if you want to toast this bread, follow the recipe and use loaf pans.

Failed bread attempt #2.
Remember when I said that this was going to get ugly? Well, this is the part about which I was talking. Remember, I do this so that you don't have to!
I got this next recipe from The Harvard School of Public Health website. People at Harvard are smart, right? Well, they are smart. I'm sure this bread is very healthy and that some people just fly to the moon when they eat it. I am not one of those people. This recipe calls for a lot of different flours : rye, buckwheat, and barley flours. I had the buckwheat and the barley on hand, so I just used those two and skipped the rye flour. The website says that you can play with the seeds and the flours and such. So, I used a cup of buckwheat flour and a cup of barley flour. This was too much buckwheat flour. I like buckwheat, especially in pancake form, but it was a little too strong in this bread. I also added flax seeds, sunflower seeds, rolled oats and wheat bran.
Here's what they looked like after baking: (warning: the following picture might cause permanent emotional scarring in more sensitive readers. Reader discretion is advised.)
OH LORD! THE HUMANITY!!!!!
Ok, so they look like bricks and they were about as heavy as bricks too. This, I later found out, is because there was no white flour in the bread. White flour has lots of gluten which makes for a more airy, lighter-textured loaf. If you read this recipe on the Harvard site, it gives you some tips on how to make the loaf lighter without using white flour. These include adding vitamin C, pectin or lecithin. I did not try any of these. Obviously. In addition to looking bad, I though it tasted bad as well. As I said above, the buckwheat flour overpowered any other flavor that might have survived in this bread. If you like the taste of buckwheat, then try this recipe, but use the "Bread Enhancers" they talk about at the bottom of the page.

Bread attempt #3: Success!!!
So, by this time, I am fire-pissed about this whole bread situation. I almost, almost gave up. I had a scathingly brilliant idea, though. I decided to find a regular whole wheat bread recipe and then just add stuff to it. The recipe I found was here. It's a whole wheat bread recipe that includes white flour. I would like to try to make it 100% whole wheat at some point, since that's healthier, but I thought I'd try it this way to see what happened. (They include the "bread enhancers" at the bottom of the web page so you can turn it into a 100% whole wheat loaf) So, I followed the recipe and added wheat bran and some ground brown and golden flax seeds.
We need a moment to discuss flax seeds and flax seed meal. Flax seeds are good for you, click here to see some health benefits. As the previous link says, ground flax seeds are easier to digest and you can get more of the benefits from grinding them. You can buy flax seed meal already ground at the health food store, but it's cheaper to buy the flax seeds and just grind them yourself as needed. Storing your flax seeds whole and grinding them as needed also keeps them fresher. When I tried to grind the wheat berries during bread attempt #1, I tried to grind flax seeds with them. No dice. So, when I was making this third loaf, I tried grinding them by themselves in the food processor, but that just spun them merrily around and left them intact. So, I looked at my coffee grinder and though "Nah, that won't work..." but I tried it anyway and it DID work. It worked like a bloody charm! So, I informed my husband, Jonathan, that I now need another coffee grinder. One for grinding coffee and one for grinding flax seeds and other sundry things. I daresay the wheat berries might even work in the coffee grinder. (If you don't want to get another coffee grinder, just use the one you have, but wipe it out with a damp cloth before and after you grind the flax seeds.)
OK, back to the bread. This recipe make one loaf and one loaf only, so that was nice. Since it was such a small amount to bread, I was able to put the dough together in my KitchenAid mixer and use the dough hook to do all the kneading for me. Keep an eye on it while it's kneading and add flour if it gets too sticky. You won't have to knead the dough as long in the mixer as you would if you were kneading it by hand, so make sure you don't over-knead it. The dough should be elastic and not too sticky. Let it rise in a warm place. My laundry room is right off the kitchen. It's out of the way and it's always warm in there, so that's where I put my bread dough to rise:
This is the dough rising on my dryer. If it's a little cool in there, I just start the dryer up for a little while and the room gets nice a toasty. This made a perfectly sized loaf. I think that if I doubled the recipe, I might still be able to use the stand mixer to knead it. I'll let you know, since I'm going to make another loaf for me and one for my sister.
Here is what the finished product looked like:
I chose this picture because it show the failed bread wallowing in it's own shame and the reflected glory of the successful loaf. Here's a look at the inside of the bread:
The bread turned out very nicely. I might not add as much flour during the kneading process next time, since it was a little crumbly as toast this morning. But the flavor was really good!
I will try and make a 100% whole wheat loaf with the bread enhancers in the next week or two and let you know how it goes.
Happy baking!

Sunday, March 20, 2011

My kitchen, its gadgets and scones!

Hello Everyone!

Here is the first post for my baking/cooking blog! It will be super fun!

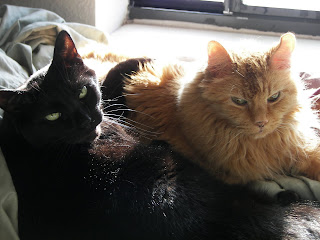
Ok, a little background and what you can expect here. It's just my husband and me in our apartment (well, with the two cats, but they rarely eat anything I cook).


The black one is Drizzt and the orange one is Claude. They are best friends.
Because it's just Jonathan and me, I usually cook in small quantities. When I bake, however, I usually bake in large quantities and send the extra with my husband to work.

This is my kitchen:

It's what my grandma would call a "Two Butt Kitchen" meaning that it's so small that you can only comfortably fit two butts in the kitchen at one time. Would I like more counter space? Sure. A double oven? Uh, yah! Alas, that is not to be at this point in time, but I muddle through. One more thing about the kitchen: it rarely looks this clean. Very rarely.
Ok, here are a couple of things that I love:

This cooling rack. Sure, it looks like just a regular cooling rack, right? Well, hold onto your socks!


That's right! It accordions out! (Accordion is a verb, right?)

Boom!
It's now an even bigger cooling rack! So awesome! I am a big fan of cooling racks, but it can sometimes be hard to find a good one. I used to have the kind with collapsible legs. So, whenever I would set a pan or cookie sheet down wrong, the legs would promptly collapse and I'd have cookies all over the place. Not awesome.

I also love my food processor.

Any time I have to make a pie crust or anything else that requires cutting cold butter into flour, I use this puppy with the dough blade. Just don't tell my grandma. She'd be so ashamed. I actually used the food processor for the following recipe. Let's bake!


Snickerdoodle Scones

I love scones. I also love snickerdoodles. I got this recipe from bakingbites.com. I had all the stuff I needed at home. I used parchment paper on the cookie sheet. Seriously, people: parchment paper. Know it. Get it. Love it.


The cinnamon sugar on the outside of the scones gives them a nice crunch. My oven is notoriously fickle, so I had to keep a close eye on these, but they golden-browned nicely. They are delicious with a nice cup of coffee or tea. I followed the recipe's guideline for the size of the scones (1/6 of the dough) and they were pretty good sized, not too big, but not too small either. I also liked these scones because it didn't require me to roll out and cut the scones. (My absolute favorite cookies are frosted sugar cookies, but I very rarely make them because I hate rolling things out and cutting them.)

Here's the recipe:

Snickerdoodle Scones

2 cups all purpose flour
1 teaspoon baking soda
1 teaspoon cream of tartar
1/4 teaspoon salt
6 tablespoons of sugar
6 tablespoons unsalted butter, chilled and cut into pieces
6 - 8 tablespoons milk or cream (I used 1% milk)
1.5 teaspoons vanilla extract
cinnamon and sugar for rolling

Preheat oven to 400 degrees F. Line a baking sheet with parchment paper. In a large bowl, whisk together flour, baking soda, cream of tartar, salt and sugar. (I used the food processor for all of the butter-cutting and mixing.) Add butter to the flour mixture and use your fingertips to rub it into the flour, breaking the butter down into pieces smaller than a pea. Combine milk (or cream) and vanilla in a small dish and add 6 tablespoons to the flour mixture. Stir with a fork until dough comes together into a slightly sticky ball. If necessary, add an additional tablespoon or two of milk, but dough should not be too wet. (You want it a little sticky so that the cinnamon sugar will stick before baking.)
Divide dough into six even balls. In a small dish, whisk together 1/4 cup sugar and 1 tsp. cinnamon. Roll each ball of scone dough in the cinnamon-sugar mixture and flatten slightly onto prepared baking sheet. Bake for about 15 minutes, until scones are set and the edges begin to brown. Cool on a wire rack before serving. (They are really good slightly warm.)

I suppose you could make a powdered sugar-glaze for these, if you want to. I didn't think they needed it.

Enjoy!